./src/components/graphql/GraphQL-ConnectedDemo.dynamic.tsx:114:72
Type error: Argument of type 'TypedDocumentNode<ConnectedDemoQueryQuery, Exact<{ datasource: string; contextItem: string; language: string; }>>' is not assignable to parameter of type 'string | DocumentNode'.
  Type 'TypedDocumentNode<ConnectedDemoQueryQuery, Exact<{ datasource: string; contextItem: string; language: string; }>>' is not assignable to type 'DocumentNode'.
    Types of property 'kind' are incompatible.
      Type '"Document"' is not assignable to type 'Kind.DOCUMENT'.
Environment
@sitecore-jss/sitecore-jss-nextjs: "^21.0.0"
@sitecore-jss/sitecore-jss-cli: "^21.0.0"
XM Cloud
After some research I found a workaround. I know this is not the best solution. But if someone else know how to fix this issue please, feel free to leave a comment.
Workaround
In order to stop the type error, I wrap the Graphql call into a js file.
index.js
 export async function myFunctionToExecuteQuery
{
.... some code here
 const result = await graphQLClient.request(MyQueryDocument, {
    myParam: myParam,
  });

return result;
}
Then I added an index.d.ts to declare the types.
export declare async function myFunctionToExecuteQuery<TResult>(
  myParam: string
): Promise<TResult| null>;
With that workaround I can still declare the query result type, and also run jss build without any error.
As I mentioned, this is not the best solution, but I can build the Next.js application successfully.
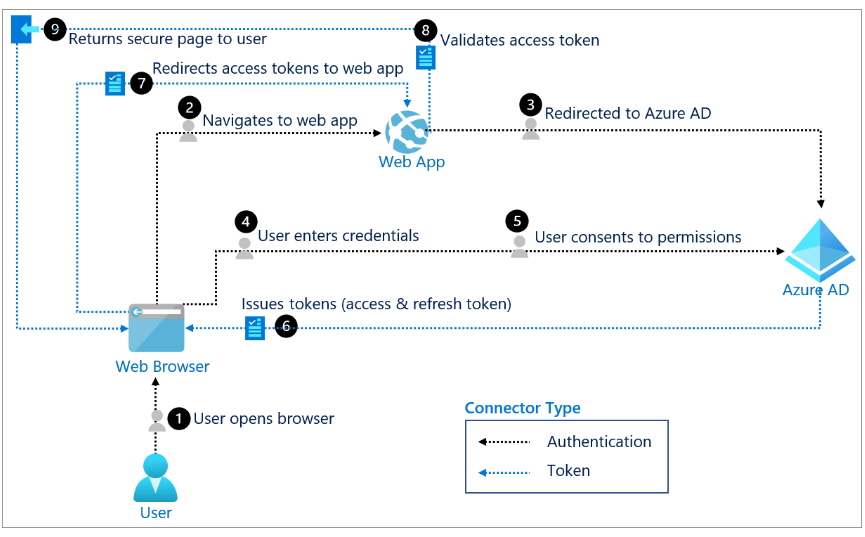
When you develop an enterprise website you might need to allow your visitors to login into your website to have a unique and personalized experience. Single Sign-On allows to your audience to enter credentials just one time instead of enter the password for each web application that your organization offers.
In the marketplace, there are many identity providers such as Google, Facebook, Microsoft, Github, etc. In enterprise environments you might have your own Azure Active Directory (Azure AD) which you store all your users information.
Sitecore provides a documentation which I found helpful to understand what needs to be configured in order to implement Federated Authentication for front-end login.
First step, you need to create a config file for example, in my Sitecore instance I have a Foundation.Accounts project, so I created a file Foundation.Accounts.SSO.config
Then inside federatedAuthentication we should add the following elements identityProvidersPerSites, identityProviders and propertyInitializer
identityProvidersPerSites add a MapEntry element which contains which sites the identity provider will be used. As I mentioned in this article, SSO will be used for website login.
In externalUserBuilder, I´m using a custom UserBuilder and IsPersistentUser is set to false. Because we don´t need to have unnecessary users in the CMS database. In other words, our users will be virtual users.
  public class ADExternalUserBuilder : DefaultExternalUserBuilder
    {
        public ADExternalUserBuilder(ApplicationUserFactory applicationUserFactory, IHashEncryption hashEncryption) : base(applicationUserFactory, hashEncryption) { }

        protected override string CreateUniqueUserName(UserManager<ApplicationUser> manager, ExternalLoginInfo externalLoginInfo)
        {
            if (externalLoginInfo == null) return "nullUserInfo";

            if (string.IsNullOrWhiteSpace(externalLoginInfo.Email))
            {
                var validUserName = externalLoginInfo.DefaultUserName;

                return $"{Constants.Domains.Extranet}\\{validUserName.Replace(" ", "")}";
            }

            return $"{Constants.Domains.Extranet}\\{externalLoginInfo.Email.Replace(" ", "")}";
        }
    }
Next section identityProviders is important because here we need to specify how claims are transformed for Sitecore Login and Business requirements. Notice that domain is extranet because our users are not part of the Sitecore domain.
For Azure AD Identity Provider I found that those 3 transformations are required. I created a custom transformation to resolve the user’s role as SetRoleInClaim.
 public class AzureADIdentityProviderProcessor : IdentityProvidersProcessor
    {
        public AzureADIdentityProviderProcessor(FederatedAuthenticationConfiguration federatedAuthenticationConfiguration, ICookieManager cookieManager, BaseSettings settings) : base(federatedAuthenticationConfiguration, cookieManager, settings)
        {
        }

       protected override void ProcessCore(IdentityProvidersArgs args)
        {
            Assert.ArgumentNotNull(args, nameof(args));

            var identityProvider = this.GetIdentityProvider();
            var authenticationType = this.GetAuthenticationType();
            var saveSigninToken = identityProvider.TriggerExternalSignOut;

            var targetHostName = GetTargetHostName();
            string aadInstance = "https://login.microsoftonline.com/{0}/";
            string tenant = Settings.GetSetting("Foundation.Accounts.SSO.AD.Tenant");
            string clientId = Settings.GetSetting("Foundation.Accounts.SSO.AD.ClientId");
            string clientSecret = Settings.GetSetting("Foundation.Accounts.SSO.AD.ClientSecret");
            string postLogoutRedirectURI = $"{targetHostName}{Settings.GetSetting("Foundation.Accounts.SSO.AD.PostLogoutRedirectURI")}";
            string redirectURI = $"{targetHostName}{Settings.GetSetting("Foundation.Accounts.SSO.AD.RedirectURI")}";
            string scope = Settings.GetSetting("Foundation.Accounts.SSO.AD.Scope");

            string authority = string.Format(CultureInfo.InvariantCulture, aadInstance, tenant);

            //Set the authentication type to use cookies
            args.App.UseCookieAuthentication(new CookieAuthenticationOptions
            {
                AuthenticationType = DefaultAuthenticationTypes.ApplicationCookie,
            });


            args.App.UseOpenIdConnectAuthentication(new OpenIdConnectAuthenticationOptions
            {
                Caption = identityProvider.Caption,
                AuthenticationType = authenticationType,
                AuthenticationMode = AuthenticationMode.Passive,
                ClientId = clientId,
                ClientSecret = clientSecret,
                Authority = authority,
                PostLogoutRedirectUri = postLogoutRedirectURI,
                RedirectUri = redirectURI,
                ResponseType = OpenIdConnectResponseType.CodeIdToken,
                UseTokenLifetime = false,
                CookieManager = this.CookieManager,
                Scope = scope,
                Notifications = new OpenIdConnectAuthenticationNotifications
                {
                    SecurityTokenValidated = notification =>
                    {
                        var identity = notification.AuthenticationTicket.Identity;
                        foreach (var claimTransformationService in identityProvider.Transformations)
                        {
                            claimTransformationService.Transform(identity,
                                new TransformationContext(FederatedAuthenticationConfiguration, identityProvider));

                        }

                        notification.AuthenticationTicket = new AuthenticationTicket(identity, notification.AuthenticationTicket.Properties);

                        return Task.FromResult(0);
                    },
                    RedirectToIdentityProvider = message =>
                    {
                        // format redirect URI so Sitecore cleans up after itself
                        var revokeProperties = message.OwinContext.Authentication.AuthenticationResponseRevoke?.Properties?.Dictionary;
                        if (revokeProperties != null && revokeProperties.ContainsKey("nonce"))
                        {
                            var uri = new Uri(message.ProtocolMessage.PostLogoutRedirectUri);
                            var host = uri.GetComponents(UriComponents.SchemeAndServer, UriFormat.Unescaped);
                            var path = "/" + uri.GetComponents(UriComponents.Path, UriFormat.Unescaped);
                            var nonce = revokeProperties["nonce"];

                            // for single sign-out, Sitecore expects the URI used below with the nonce in the query string
                            // this URI was found in Sitecore.Owin.Authentication.Pipelines.Initialize.HandlePostLogoutUrl
                            message.ProtocolMessage.PostLogoutRedirectUri = $"{host}/identity/postexternallogout?ReturnUrl={path}&nonce={nonce}";
                        }

                        return Task.FromResult(0);
                    }

                },
                TokenValidationParameters =
                {
                    SaveSigninToken = saveSigninToken
                }
            });


        }

        protected override string IdentityProviderName => "AzureADIdentityProvider";
    }
This part is when I had a lot of issues, for me it is important to understand the settings. You can set up an enterprise application for Azure AD, then you can provide to the webapp the following fields: Tenant, Client Id and Client Secret.
Also is very important that you set up correctly the Redirect URL in your Azure AD Application, for example, in our case: https://sitecore-instance.dev/identity/externallogincallback.
Note:
Probably for .Net experts is obviously that redirect url will be something like targethostname + /identity/externallogincallback. However I spent a lot of time trying to figured out which is the callback url. Hopefully this article saves your time if this is your first ASP.NET Identity implementation.
Setting
Value
Foundation.Accounts.SSO.AD.Tenant
Azure Tenant
Foundation.Accounts.SSO.AD.ClientId
Azure Application Client Id
Foundation.Accounts.SSO.AD.ClientSecret
Azure Application Client Secret
Foundation.Accounts.SSO.AD.PostLogoutRedirectURI
/identity/postexternallogout
Foundation.Accounts.SSO.AD.RedirectURI
/identity/externallogincallback
Foundation.Accounts.SSO.AD.Scope
openid profile roles
Generate sign-in links:
Finally, I created a AuthManager class in order to retrieved the sign-in link, where I can place it for example, in the header component.
 public SignInUrlInfo GetLoginUrl(string redirectUrl = "/")
        {
            var corePipelineManager =
                (BaseCorePipelineManager)Sitecore.DependencyInjection.ServiceLocator.ServiceProvider.GetService(typeof(BaseCorePipelineManager));
            var args = new GetSignInUrlInfoArgs(site: "website", returnUrl: redirectUrl);
            GetSignInUrlInfoPipeline.Run(corePipelineManager, args);
            var result = args.Result.FirstOrDefault();
            return result;
        }
Conclusion
To quickly recap, It is necessary to create a config file to place federatedAuthentication configurations and a processor in our case AzureADIdentityProviderProcessor to configure owin middleware. Then, you need to override ProcessCore method to add args.App.UseOpenIdConnectAuthentication configuration in IdentityProvidersProcessor implementation. Finally generate sign-in links and you are all set. It sounds easy but for me it took some days of research and trying to understand what values I need to include in the config files. I hope with this example you can save a lot of time and it could be helpful to understand this Sitecore feature.
Many businesses require to implements GEO IP Services. Business Rules differ between locations. As Developers, Sitecore makes our lives easier by providing a Service that we can use to obtain the location of the website’s visitor.
The IP Geolocation provides information like country, state, city, and every visitor’s registered company name as well. Based on geodata, we can build modules that interact with our visitors and provide accurate information depending on where they are.
In your Siecore Solution ensure you add the following Nuget Packages:
Sitecore.Kernel
Sitecore.Analytics
Solution
Sometimes when you work with lower environments or your local environment Geo IP is not available. I developed the following simple class to get the visitor’s country and city. We can add the next file to setup a city and country code when Sitecore IP Geolocation is not available for your local. I used Sitecore 10.2.
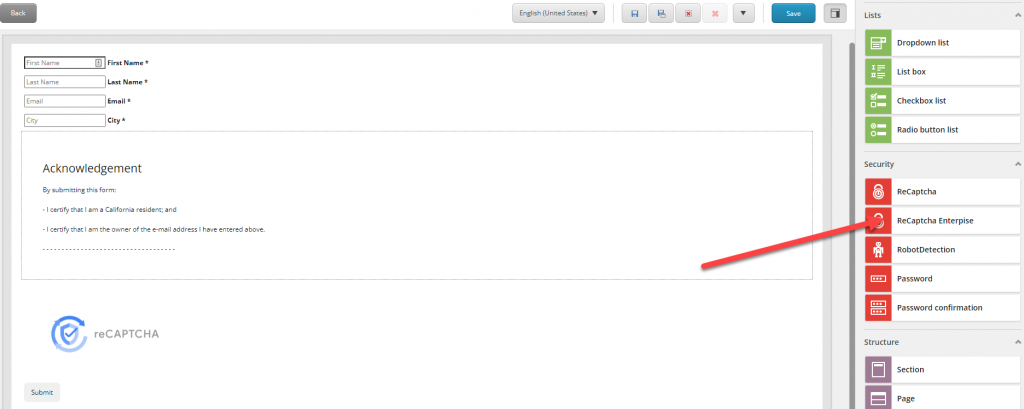
Sitecore is a powerful DXP it is desiged for enterprise-level websites. As Marketers you would need to set up your forms and Sitecore provides a solution out-of-the-box to easily create your own forms by drag and drop your form controls like: Text, Buttons, Inputs and customize submit actions. However, your site is vulnerable to bot attacks and some companies prefer to use Google’s reCaptcha to prevent bot traffict to their websites.
I’ve been working on a Sitecore forms module, which support the ReCaptcha Enterprise version within Sitecore Forms. If you want to contribute in the module development please refer the following Github Repo:
Once you installed the nuget package. The installation will add a config file:
\Website\App_Config\Include\Foundation\SitecoreModules.Foundation.Forms.ReCaptchaEnterprise.nonprod.config.example
You need to clone it and change it accordingly your environment.
[Api Key] – This is used for Server Side Validation
Foundation.Forms.ReCaptchaEnterprise.Score
Default to 0.5.
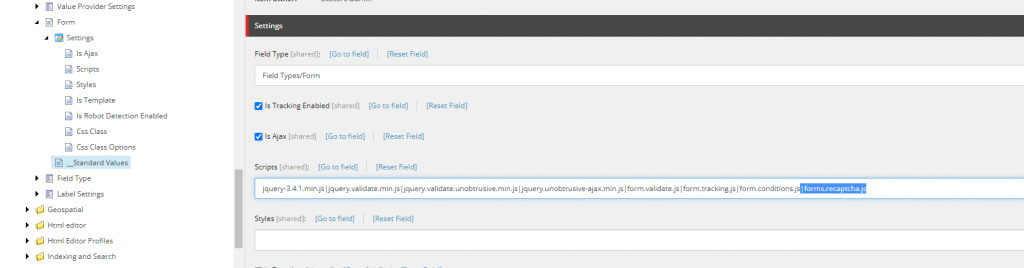
Finally, you need to ensure that forms.recaptcha.js is added on standard values to load the js functionality that is required to work, as the following screenshot.
Usage
This module is easy to use. All you need to do is Drag and Drop the control named: “ReCaptcha Enterprise” which is located under Security section.
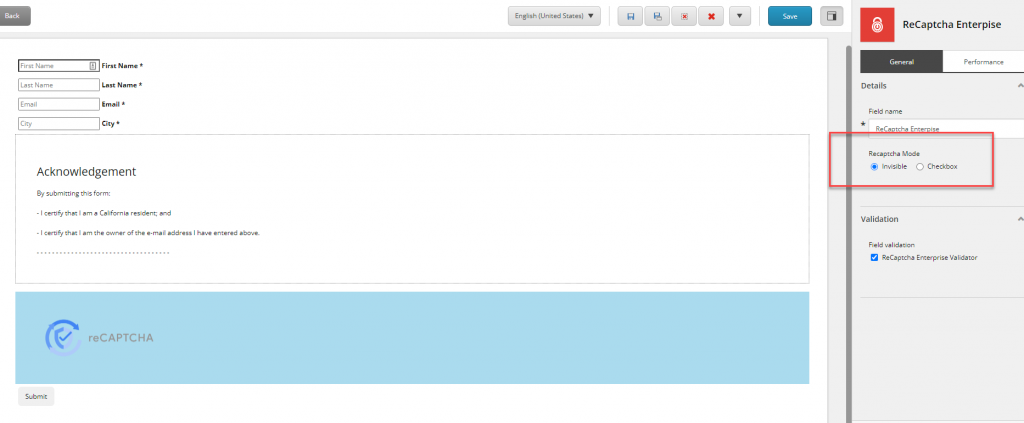
Then you can configure the module by click on it, then select the mode, it could be:
Invisible: Provides a better user experience, reCaptcha v3 is invisible for webiste visitors.
Checkbox: Use a challenge if Google detects a bot behaviour.
Finally, save your form. I hope you find this modue useful on your projects.
I’m very happy to participate in Sitecore Hackathon 2022!. I participated with my teammate Daniel Pastor in the team Send Pizza and Coffee and I’m proud of what we archived. This year there were 3 topics for Sitecore Hackathon ideation.
Build and e-commerce Minimum Viable Product to sell community t-shirts
Extend the Sitecore Command Line (CLI) Plugin
Best addition to the Sitecore MVP Site.
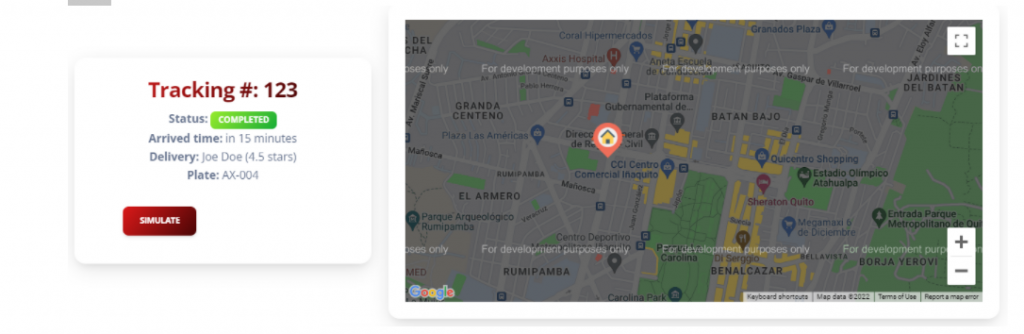
Additionally we were thinking in a problematic that business have to facing during the COVID-19. One of the coolest rewards after becoming a Sitecore MVP has always been the Sitecore Swag we receive. However, due to the pandemic and changes from year to year, the delivery process can be a little confusing. We decided to make a “Sitecore MVP Swag tracker” page with some modules where the user could track the delivery status of their care package.
The value of real-time systems came into focus in 2020 as companies responded to the disruptions due to COVID-19. Nowadays, people want to have information at hand efficiently, this creates confidence in technological users, the information must be in real time, the actual generation want the information right now.
This module will display the status of the delivery in real time from an external push service which could come from a mobile app from the delivery service.
Our proposal was focused on the user experience, they could know where the MVP swag package is in the delivery process. Our technology is based in web-sockets using Pusher as key platform to our solution succeed.
Web-sockets provides a channel to broadcast to the users the information about their package tracking with the following events:
On Track: Send the deliver man location in real-time, the idea is that each delivery man have a mobile application that sends the geo location.
In Order Completed: This event notify to the website’s user that the order is completed and delivered at the door.
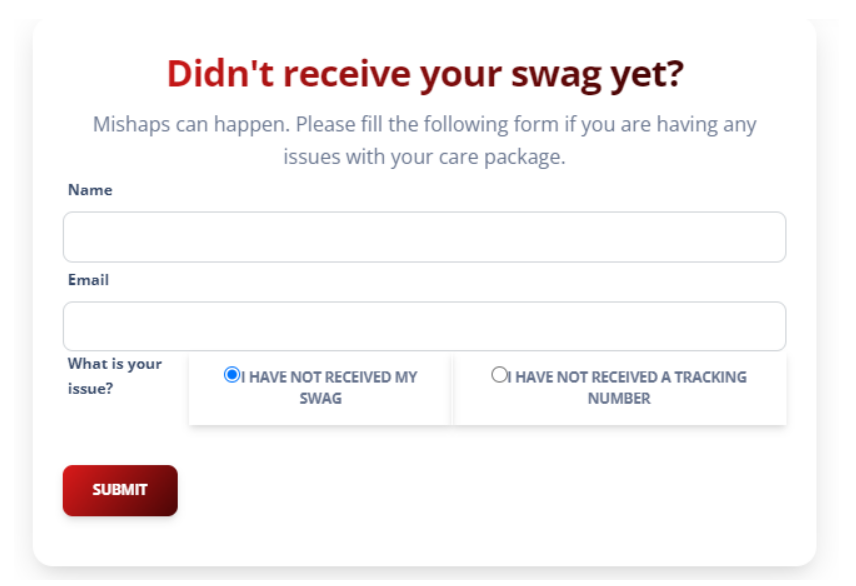
Finally, we provide a Sitecore Form which could be use in case that something wrong happens with the delivery, and the people in charge could get in contact.
You’ll find more information about our project in the following link:
In Article I’ll show you how to create a module in Sitecore using JSS and NextJS. For who is not familiar with this topics. I explain a little bit in my previous blogpost.
Prepare your environment
Before create a new component, you need to connect your Sitecore website with JSS front end project. The easy solution is using Docker and create a new project based on sitecore.nextjs.gettingstarted template.
If you don’t want to use docker you need to ensure that you have installed Sitecore Headless Services (formally the JSS Server Components).
Create a Json Rendering
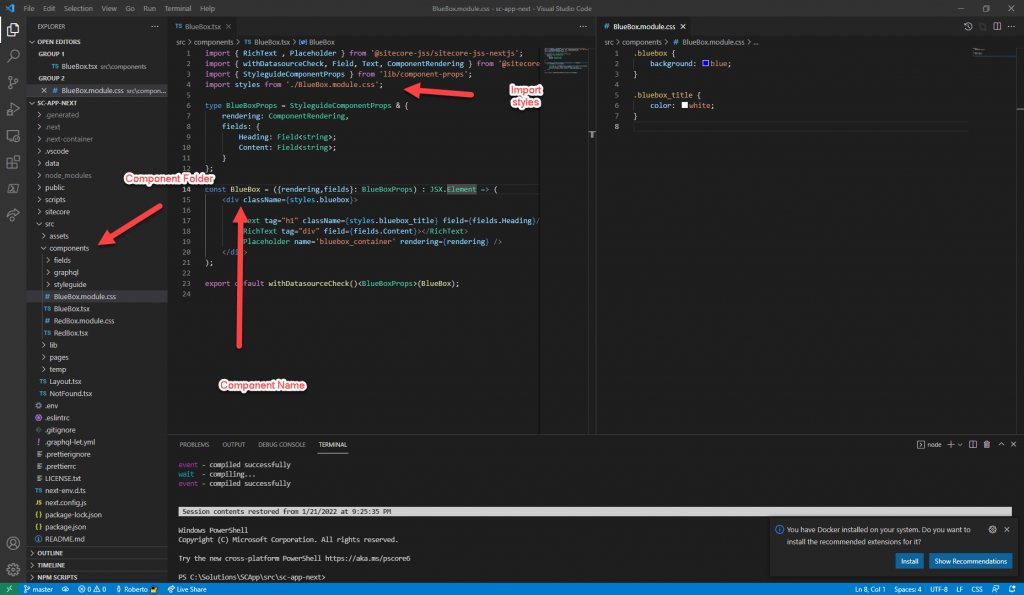
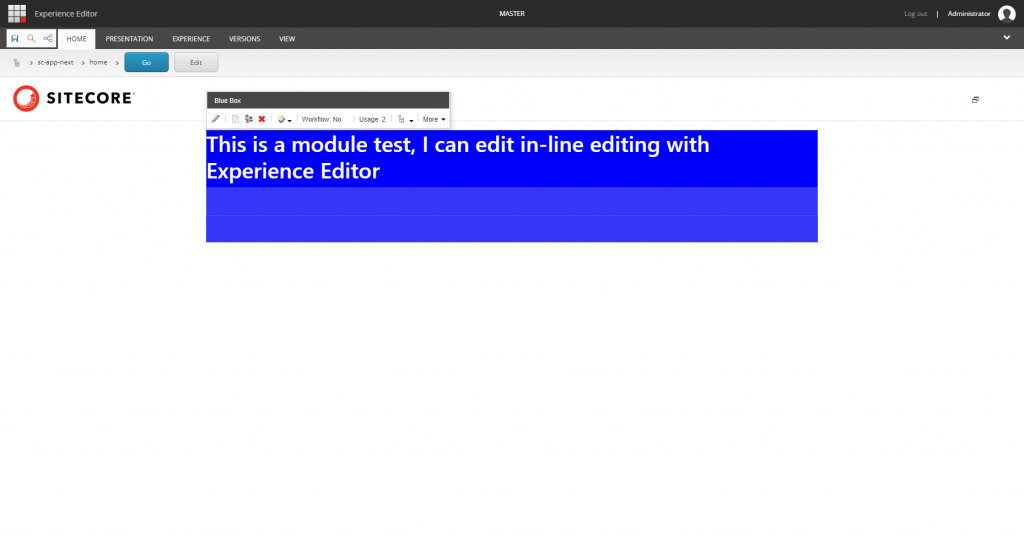
Json Rendering let you create a rendering which connects to your React Module. First, you need to create your Json Rendering for this example, I’ll create a "Blue Box" component.
In experience editor, to allow content authors the ability to select the new component you can added in the placeholder settings as a normal component in Sitecore.
In your Front End Solution (NextJS Solution), you can add a new file /src/components/BlueBox.tsx, we can create the component as React Functional Component.
To import assets or styles you can use import statement and create your modular style file like [Module-Name].module.css.
In order to support inline-editing through experience editor you can use the Text component which is part of '@sitecore-jss/sitecore-jss-react' library.
Do not forget to start your Front-End server with jss start.
If you want to ensure that Data Source is not empty you can use the withDataSourceCheck() hook
Finally, you can add the rendering in your JSS Application Route Page and you are ready to go. Stay tuned and I will enter in details using Placeholders in JSS Application.
JAMStack is a modern way to build website and apps that delivers better performance. JSS enables Sitecore to be a powerful Headless CMS and Next.js gives you the best developer experience to build a hybrid static & server rendering.
In this article, I’ll talk about how to get started on Sitecore JSS and Next.js. For this experiment, I followed the instructions provided by Sitecore in the following link:
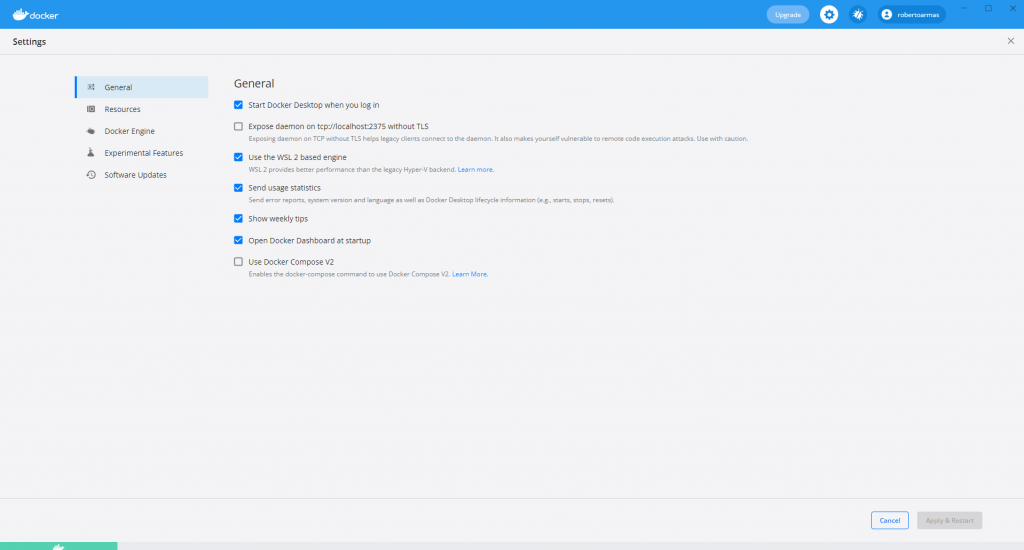
If you have the latest Docker Desktop, please disable Use Docker Compose V2.
In order to start up JSS project you should navigate to src\rendering folder which contains the NextJS project.
You can run the following command and then you are ready to go.
jss start
I found Docker containers as an easy way to set up a Sitecore environment you don’t need to worry about to install Solr, create the certificates, etc.
Next.js is the future of web development, it is the most famous framework to build super fast and SEO-efficient JAMStack websites with the following important benefits for me:
Faster time to market – make and build an MVP (Minimun Viable Product) is much faster.
Performance – NextJS generates an static website that runs on NodeJS. Improved page load speed which means higher conversion rate.
Live Reload – Working with those frameworks, I love that development is fast you don’t need to wait to compile, it is a live-editing experience.
Fully omnichannel– you don’t need to worried about to build API’s for website or mobile applications. You can reuse some React components for your mobile application if you are using web-based technologies.
In future blog posts, I could prepare tutorials about Sitecore module development. Stay tuned!
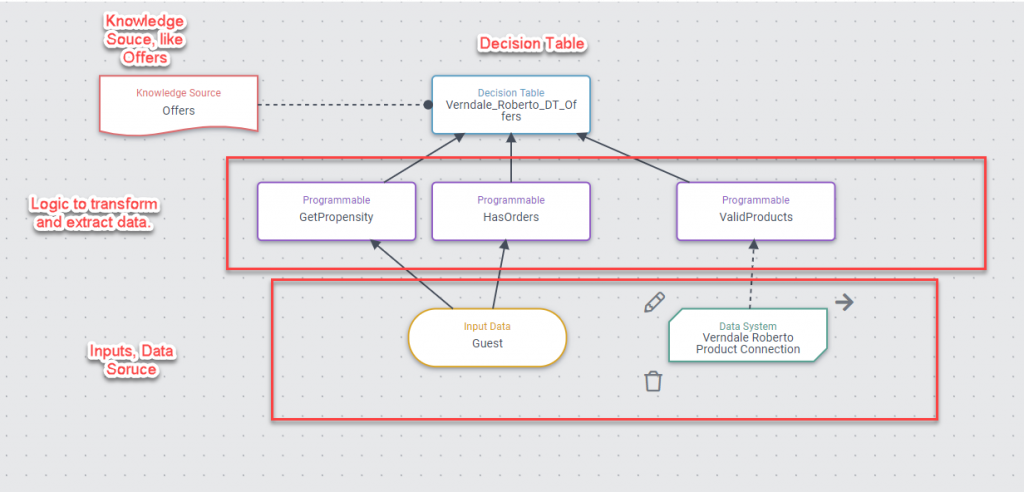
Sitecore CDP is a Customer Data Platform, which means that we can store data related to our customers.
This valuable data is very useful for analysis and allows you to make assertive marketing decisions. Sitecore CDP allows you to create Decision Tables or even Decision Template which are programmable.
Basically best practices mentioned to begin from bottom to top that makes easily to read. Based on that I could say in this example we have three sections.
Model Inputs: Here we can add Input Data like guest data or connect to a Data System API’s.
Transform and Extract Data: We can add programable boxes to add some logic to validate data, extract fields like GetPropensity, or Order Related Data like HasOrders from the Guest Object.
Decision Table, Knowledge Source: At the very top we have the Decision Table.
Decision Table Overview
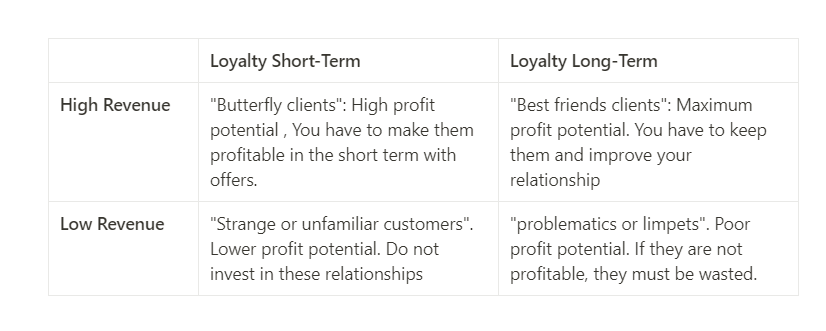
Client groups according revenue. Adapted from: Esteban-Talaya y Mondéjar-Jiménez (2017). Kotler and Armstrong (2018).
Here we can implement some Marketing Strategies for example if we have a “Butterfly client” we can give them an offer. or if we have a client which is a “unfamiliar” we can give them a lower offer or even decide to do not invest on them.
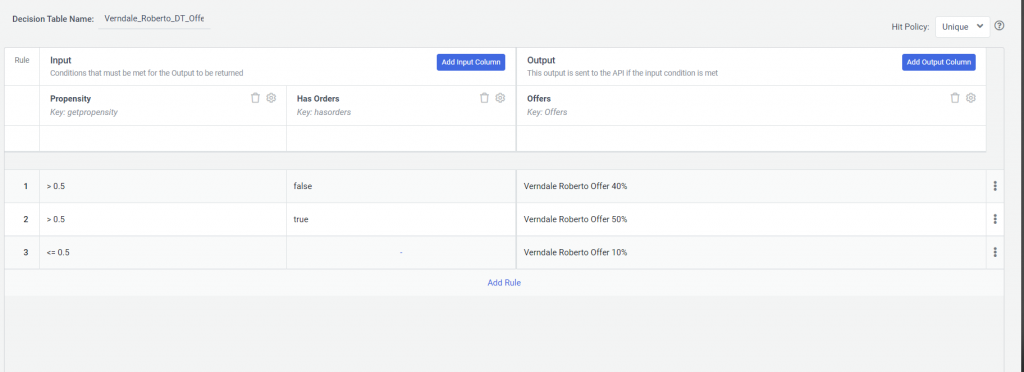
Our decision table has inputs and outputs:
Input: Propensity, Has Orders.
Output: Offers
This presented Decision table is a basic example how you can make automated decisions, and how powerful is this platform for your business. It helps you to maintain a good relationship with your clients.
Sitecore CDP is a great platform that allows you to register Customer Data for analysis and build Decision Models to create Customer Experiences.
As a developer our first steps are to capture data, it could be some integrations like visiting a page. In this article I will show you how to send events to Sitecore CDP.
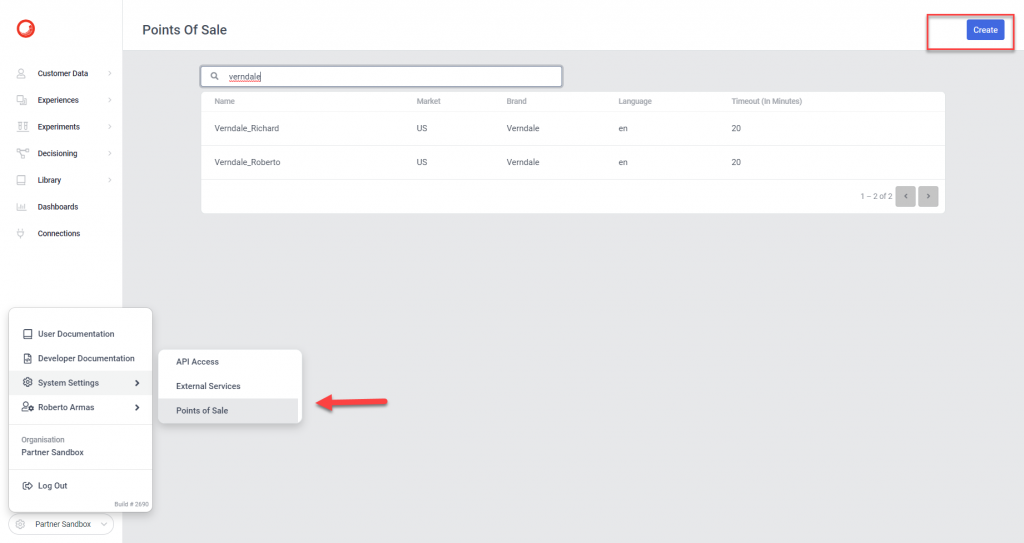
Step 1. Create your Point of Sale
Click on System Settings > Point of Sale then click on Create
Fill the form:
Name your Point Of Sale: Your Point of Sale Name.
Market: Information about the market.
Brand: You can fill with your brand.
Language: Target language
Timeout (in minutes) : Once an user is inactive to close the browser there is a timeout setting that is useful to understand when the user abandon the session.
Step 2: Setup Javascript Library in your Website
var _boxeverq = _boxeverq || [];

// Define the Boxever settings
var _boxever_settings = {
  client_key: '[YOUR_CLIENT_KEY]',
  target: 'https://api.boxever.com/v[YOUR_API_VERSION]',
  cookie_domain: '[YOUR_WEBSITE_DOMAIN]',
  web_flow_target:  "https://[YOUR_WEBFLOW_TARGET].cloudfront.net",
  pointOfSale: "[YOUR_POINT_OF_SALE]"
};

(function() {
  var s = document.createElement('script'); s.type = 'text/javascript'; s.async = true;
  s.src = '[CDN]/boxever-1.4.1.min.js';
  var x = document.getElementsByTagName('script')[0]; x.parentNode.insertBefore(s, x);
})();
Add this script into your website and this will inject Sitecore CDP JavaScript Library.
Step 3: Add Event in your website page.
// Place an anonymous function in the Boxever queue
_boxeverq.push(function() {
  var viewEvent = {
    browser_id: Boxever.getID(),
    channel: "WEB",
    type: "VIEW",
    language: "EN",
    currency: "USD",
    page: "/", // Your page path
    pos: "[YOUR_POINT_OF_SALE]"
  };
   //Add UTM params
    viewEvent = Boxever.addUTMParams(viewEvent);
  // Invoke event create
  // (<event msg>, <callback function>, <format>)
  Boxever.eventCreate(viewEvent, function(data) {}, "json");
});
Step 4: Visit your website
Finally if you visit your website and then go to Sitecore CDP Platform you will see a new event registered for your target user.
Here you can find more information about how to customize an event:
This article will explain how you can improve the Content Author’s experience. Actually, content authors need to change content or settings (like checkbox, drop list) on data source which probably is not accessible by the Experience Editor´s UI. What content authors usually do in those cases, is open Content Editor and browse the data source and edit it, but at this point content author exits the experience editor.
In order to improve their lives, it´s recommended to use a Custom Experience Button.
You can create an Experience Button from the content editor using the following steps:
Select Core Database
Switch to Core DB
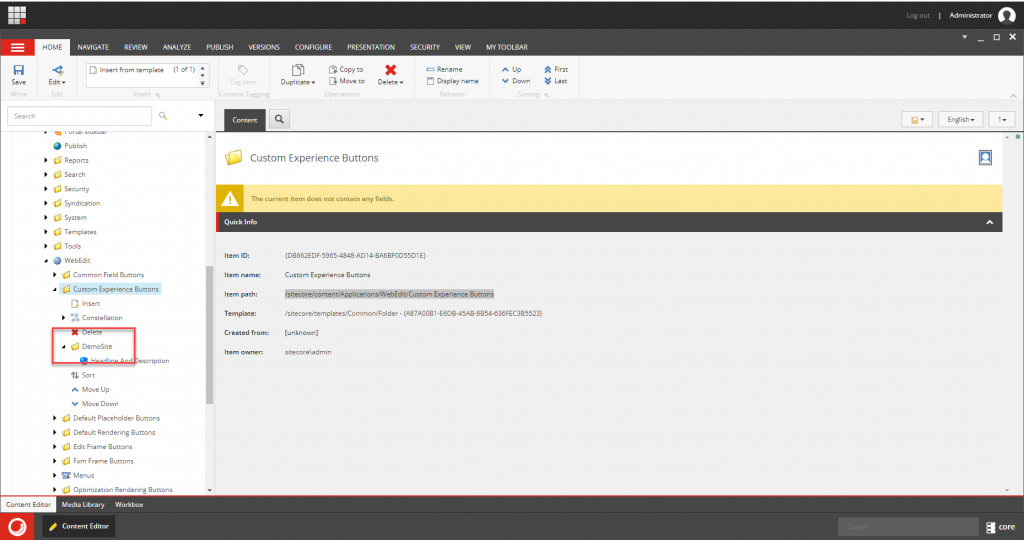
Go to path /sitecore/content/Applications/WebEdit/Custom Experience Buttons
3. You can create a folder with your site name that contains the experience buttons for your module.
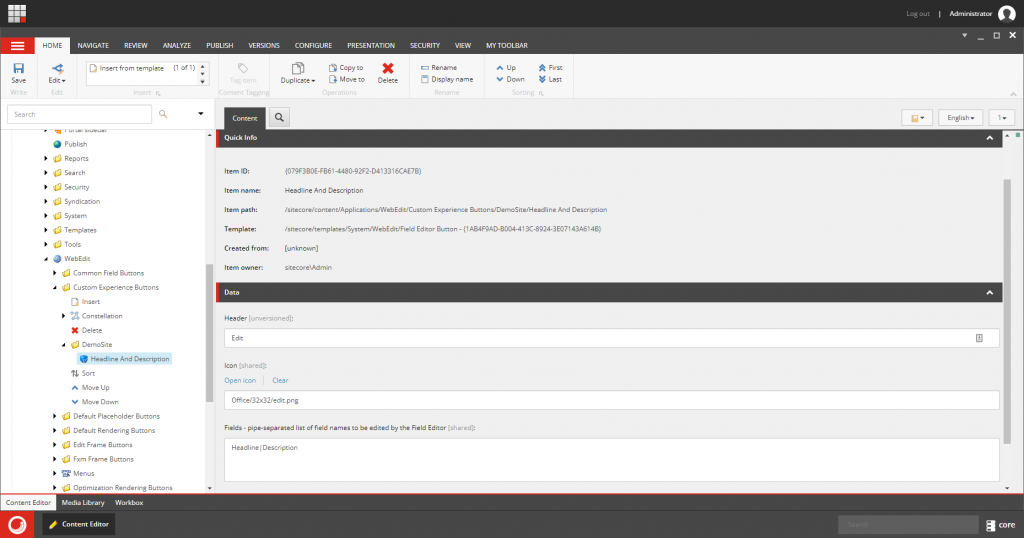
Create an item like [Your-Module-Name] with /sitecore/templates/System/WebEdit/Field Editor Button Template.
Header: You can fill with “Edit”
Icon: Choose an icon, edit.png fits.
Fields: Pipe-separated list of field names to be edited by the Field Edtior
Tooltip: you can fill with “Edit”.
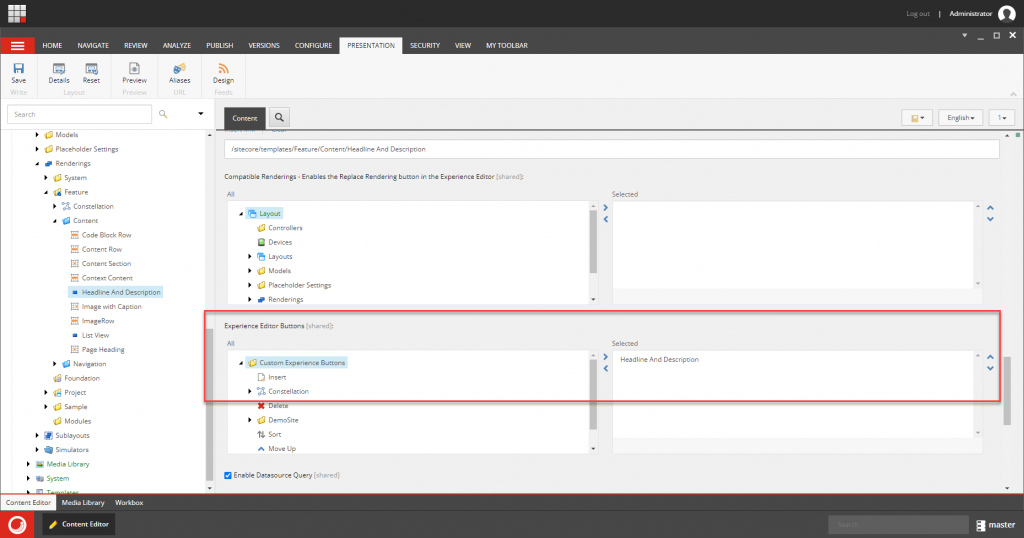
5. Add your Experience Button in your desired Rendering.
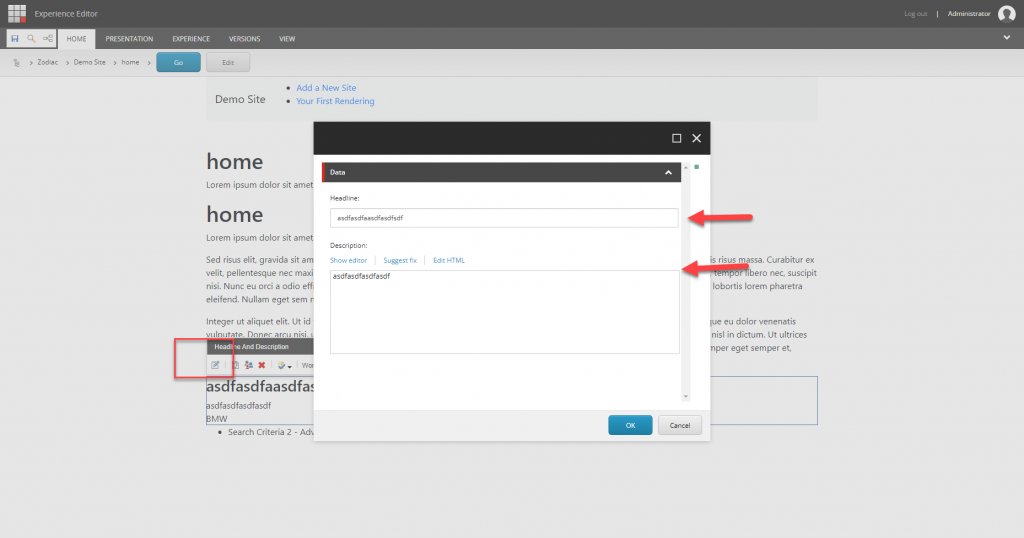
6. Now, in Experience Editor you can see a new Button in the options. If you clicked you will find a form to fill all fields that you declared in the Experience Button.
This will increse the content authors experence using Experience Editor, especially in the fields that are not in-line editing.
We use cookies on our website to give you the most relevant experience by remembering your preferences and repeat visits. By clicking “Accept”, you consent to the use of ALL the cookies.
This website uses cookies to improve your experience while you navigate through the website. Out of these cookies, the cookies that are categorized as necessary are stored on your browser as they are essential for the working of basic functionalities of the website. We also use third-party cookies that help us analyze and understand how you use this website. These cookies will be stored in your browser only with your consent. You also have the option to opt-out of these cookies. But opting out of some of these cookies may have an effect on your browsing experience.
Necessary cookies are absolutely essential for the website to function properly. This category only includes cookies that ensures basic functionalities and security features of the website. These cookies do not store any personal information.
Any cookies that may not be particularly necessary for the website to function and is used specifically to collect user personal data via analytics, ads, other embedded contents are termed as non-necessary cookies. It is mandatory to procure user consent prior to running these cookies on your website.