Notes from a .Net Developer working with XM Cloud.

XM Cloud is a comprehensive Software-as-a-Service (SaaS) product designed to provide organizations with a powerful platform for managing their digital experiences. As a developer, you can start learning easily by fork the following project https://github.com/sitecorelabs/xmcloud-foundation-head.

To set up XM Cloud, please follow the instructions provided in the README file. One of the commands you need to run is the init command, which will generate keys for secure HTTPS connections. After running this command, you may notice that changes have been made to your .env file.

Please refer to the README file for detailed instructions on how to run the init command and this update your .env variables accordingly.

To complete the setup process, execute the up.ps1 script. This script will download the necessary files and create local Docker containers for XM Cloud. Running the script will ensure that all the required components are set up correctly and ready for use.

I’m taking by .NET developer persepective, venturing into the world of XM Cloud, there are a few key things you’ll need to learn and familiarize yourself with:

  • Be familiar with React Lifecycle. Understanding the React component lifecycle is essential for working with XM Cloud, as it is built on React and Next.js.
  • TypeScript: TypeScript is a statically-typed superset of JavaScript, and it’s beneficial to learn its syntax and features. W3Schools offers documentation and tutorials for TypeScript, providing a comprehensive resource to get you up to speed with the fundamentals.
  • Next.js Documentation: Next.js is the framework used in XM Cloud, and familiarizing yourself with its documentation is crucial. The Next.js documentation provides detailed information on concepts, features, and best practices for building applications with Next.js.
  • Sitecore Documentation: Sitecore, the company behind XM Cloud, provides valuable documentation and resources to help you ramp up on their platform.

By focusing on these resources, you’ll gain a solid foundation for working with XM Cloud.

Here are some observations and key points to keep in mind while working with Next.js and XM Cloud:

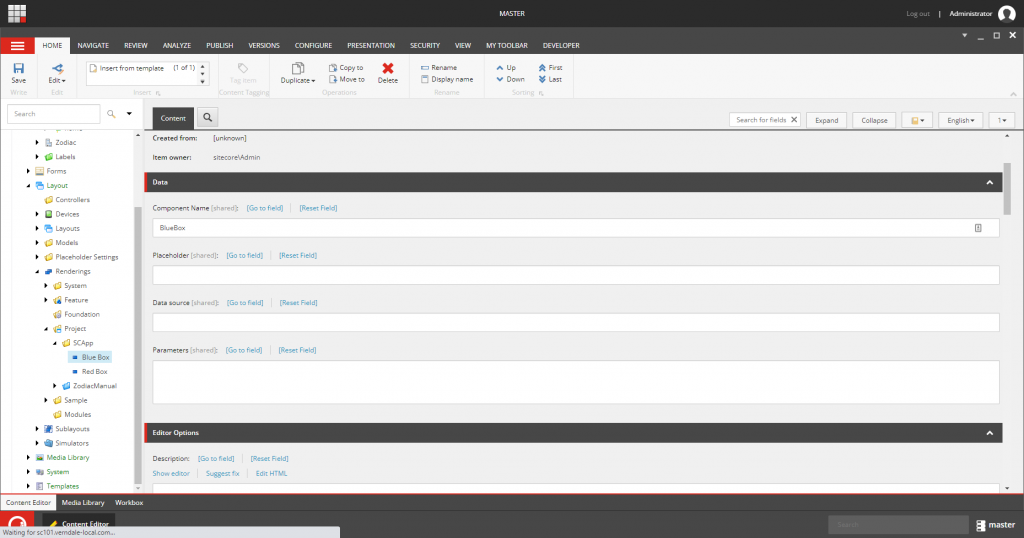
  • In the context of Sitecore MVC (Model-View-Controller), you typically use “Controller Rendering” to render dynamic content on web pages. Similarly, in Next.js, you can achieve similar functionality using “Server-Side Rendering (SSR)” or “Static Site Generation (SSG)” techniques by using a “Json Rendering” Template in Sitecore.
  • If you have been using TDS for Sitecore development, you can leverage Sitecore Serialization for Visual Studio as an alternative. It offers similar functionality to TDS, allowing you to manage Sitecore items using serialization. Sitecore Serialization for Visual Studio integrates with Visual Studio IDE and provides a user-friendly interface for working with serialized items.
  • Alternatively, you can use Sitecore Serialization from the command line, which offers a similar experience to Unicorn. Sitecore CLI integrates with Sitecore Serialization and provides commands for serialization tasks, allowing you to automate item serialization operations from the command line.
  • In traditional .NET Framework, the logic for retrieving data and preparing it for rendering is typically handled in controllers. However, in Next.js, you can achieve similar functionality by utilizing the
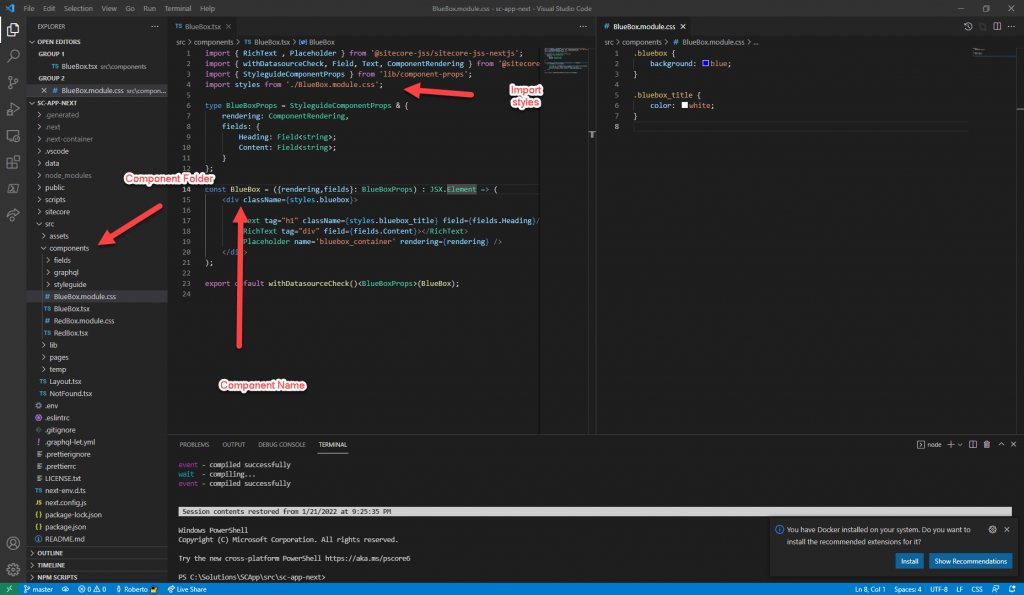
 getStaticProps function.
  • In Next.js, the term “model” is not commonly used as a specific concept. Instead, the focus is on React components and the data passed to these components as props. The props represent the data and behavior that are passed from a parent component to its child component. By defining the expected props fields, you establish a contract for the data that should be passed to the component.
  • The view is represented by the React components that define the structure and rendering logic of the user interface. These components are responsible for rendering data, managing local state, and defining the appearance and behavior of the UI elements.
  • In the Sitecore .NET framework, Sitecore.Context.Item is used to access the current item being processed. In contrast, in Next.js with Sitecore implementation, the equivalent would be accessing the route information through layoutData.sitecore.route. or sitecoreContext.route

Based on my learning experience, I’ve been working with Richard Cabral (developer of constellation4sitecore for .NET MVC Solution) in a framework that eliminates the complexities often associated with integrating Next.js and Sitecore (SXA), providing you with a smooth development experience.

This framework is in beta version and consist in the following features:

  • @constellation4sitecore/foundation-labels: It is an alternative of dictionaries, this helps you to consolidate all translatable texts for a component in one place.
  • @constellation4sitecore/foundation-data: This package helps you to access item information easily for example: getItem(itemId), derivedFrom(itemId, ‘BASE TEMPLATE ID’), getTemplateInfo(itemId) which perform graphql queries for you.
  • @constellation4sitecore/foundation-mapper: Foundation mapper contains helpers for maping fields based on Graphql structure to a props fields structure.
  • @constellation4sitecore/feature-navigation: A set of templates to easily build a navigation using Next.js. More examples comming up.

In the coming weeks, I will be posting more detailed documentation and helpful samples on how to effectively use our project. These resources will serve as valuable references for developers who are interested in leveraging our work. So, stay tuned for updates and get ready to dive into the exciting world of our project. Happy coding and exploring the possibilities it offers! If you have any questions or need assistance, please don’t hesitate to reach out.

Read more

[Workaround] XM Cloud: Error building sample Next.js app

I started an XM Cloud project using Next.js as Rendering Host. I added some Graphql code, but when I want to run jss build I got an error similar to the next one. https://sitecore.stackexchange.com/questions/33141/error-during-build-of-sample-next-js-app

./src/components/graphql/GraphQL-ConnectedDemo.dynamic.tsx:114:72
Type error: Argument of type 'TypedDocumentNode<ConnectedDemoQueryQuery, Exact<{ datasource: string; contextItem: string; language: string; }>>' is not assignable to parameter of type 'string | DocumentNode'.
  Type 'TypedDocumentNode<ConnectedDemoQueryQuery, Exact<{ datasource: string; contextItem: string; language: string; }>>' is not assignable to type 'DocumentNode'.
    Types of property 'kind' are incompatible.
      Type '"Document"' is not assignable to type 'Kind.DOCUMENT'.

Environment

  • @sitecore-jss/sitecore-jss-nextjs: "^21.0.0"
  • @sitecore-jss/sitecore-jss-cli: "^21.0.0"
  • XM Cloud

After some research I found a workaround. I know this is not the best solution. But if someone else know how to fix this issue please, feel free to leave a comment.

Workaround

In order to stop the type error, I wrap the Graphql call into a js file. index.js

 export async function myFunctionToExecuteQuery
{
.... some code here
 const result = await graphQLClient.request(MyQueryDocument, {
    myParam: myParam,
  });

return result;
}

Then I added an index.d.ts to declare the types.

export declare async function myFunctionToExecuteQuery<TResult>(
  myParam: string
): Promise<TResult| null>;

With that workaround I can still declare the query result type, and also run jss build without any error.

As I mentioned, this is not the best solution, but I can build the Next.js application successfully.

Read more

Create your first JSS module with NextJS – Part 1

In Article I’ll show you how to create a module in Sitecore using JSS and NextJS. For who is not familiar with this topics. I explain a little bit in my previous blogpost.

Prepare your environment

Before create a new component, you need to connect your Sitecore website with JSS front end project. The easy solution is using Docker and create a new project based on sitecore.nextjs.gettingstarted template.

If you don’t want to use docker you need to ensure that you have installed Sitecore Headless Services (formally the JSS Server Components).

Create a Json Rendering

Json Rendering let you create a rendering which connects to your React Module. First, you need to create your Json Rendering for this example, I’ll create a "Blue Box" component.

Template: /sitecore/templates/Foundation/JavaScript Services/Json Rendering

In experience editor, to allow content authors the ability to select the new component you can added in the placeholder settings as a normal component in Sitecore.

In your Front End Solution (NextJS Solution), you can add a new file /src/components/BlueBox.tsx, we can create the component as React Functional Component.

To import assets or styles you can use import statement and create your modular style file like [Module-Name].module.css.

In order to support inline-editing through experience editor you can use the Text component which is part of '@sitecore-jss/sitecore-jss-react' library.

Do not forget to start your Front-End server with jss start.

If you want to ensure that Data Source is not empty you can use the withDataSourceCheck() hook

Finally, you can add the rendering in your JSS Application Route Page and you are ready to go. Stay tuned and I will enter in details using Placeholders in JSS Application.

Read more

Getting Started Sitecore JSS with NextJS

JAMStack is a modern way to build website and apps that delivers better performance. JSS enables Sitecore to be a powerful Headless CMS and Next.js gives you the best developer experience to build a hybrid static & server rendering.

In this article, I’ll talk about how to get started on Sitecore JSS and Next.js. For this experiment, I followed the instructions provided by Sitecore in the following link:

Walkthrough: Setting up a development environment with the Sitecore Containers template for Next.js

Once you follow the steps you’ll be able to log in to Sitecore CM and browse the website.

During the initial setup, I found some issues related to Docker configuration and I found this article really useful:

Sitecore 10 on docker – common issues – Error cotidianam (wordpress.com)

If you have the latest Docker Desktop, please disable Use Docker Compose V2.

In order to start up JSS project you should navigate to src\rendering folder which contains the NextJS project.

You can run the following command and then you are ready to go.

jss start

I found Docker containers as an easy way to set up a Sitecore environment you don’t need to worry about to install Solr, create the certificates, etc.

Next.js is the future of web development, it is the most famous framework to build super fast and SEO-efficient JAMStack websites with the following important benefits for me:

  • Faster time to market – make and build an MVP (Minimun Viable Product) is much faster.
  • Performance – NextJS generates an static website that runs on NodeJS. Improved page load speed which means higher conversion rate.
  • Live Reload – Working with those frameworks, I love that development is fast you don’t need to wait to compile, it is a live-editing experience.
  • Fully omnichannel– you don’t need to worried about to build API’s for website or mobile applications. You can reuse some React components for your mobile application if you are using web-based technologies.

In future blog posts, I could prepare tutorials about Sitecore module development. Stay tuned!

Read more